Construction Progress Videos Using Waypoint Missions

Waypoint missions provide an effective method for documenting construction projects over an extended period of time. By repeatedly flying the same predetermined flight path, video can be captured from consistent positions and perspectives as construction progresses from the initial site preparation through completion.
In practice, however, footage from two flights of the same waypoint mission will rarely align perfectly. Small variations in waypoint positioning, aircraft altitude, heading, gimbal angle, and flight conditions can cause the camera framing to shift slightly from one flight to the next. These differences become particularly noticeable when transitioning directly from footage captured at different stages of construction.
The following workflow is designed to minimize these differences and provide greater flexibility when assembling footage from multiple flights into a continuous construction progress video.
Mission Planning
- Create the Waypoint Mission
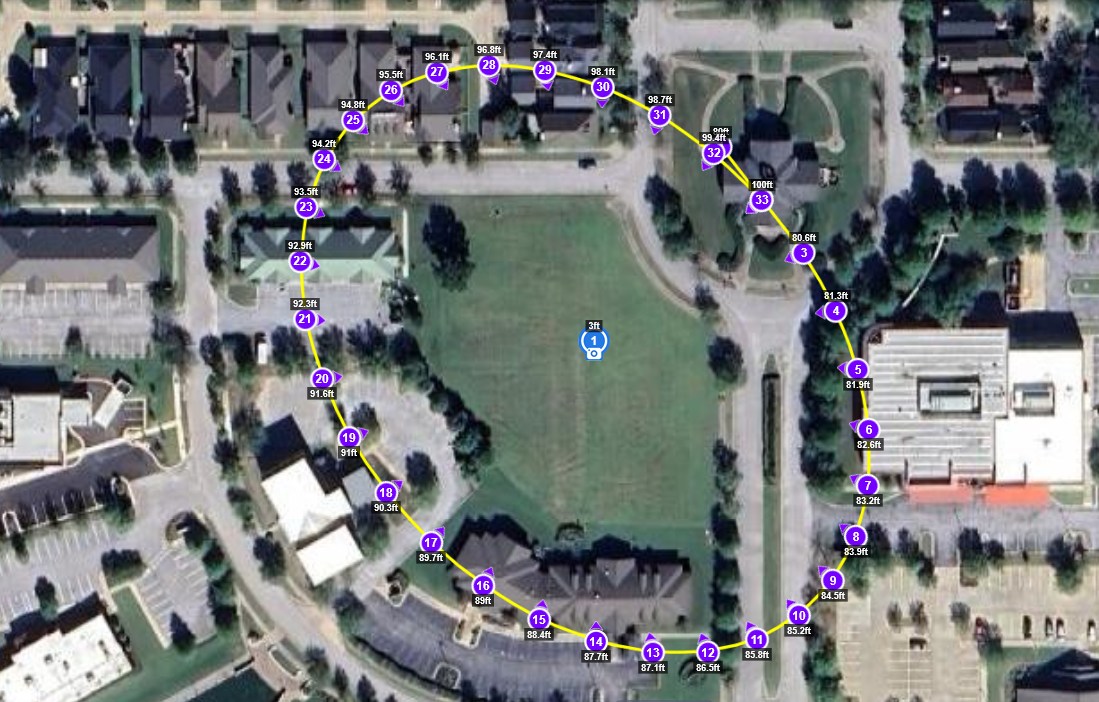
Create a circular or elliptical waypoint mission around the construction area. The mission should provide sufficient distance and camera coverage to capture the project from all desired viewing angles.
I often use either the Spiral Mission Creator or Ellipse Mission Creator to create the initial waypoint mission.
The mission should be designed with the final video in mind. Consider the desired camera perspective, distance from the subject, altitude, and amount of construction activity that should be visible in each segment.
- Perform a Complete Test Flight
Before beginning the construction-progress sequence, fly the entire mission as a test.
Verify that:
- The construction area remains within the desired camera field of view throughout the flight.
- The aircraft maintains an appropriate distance and altitude from the subject.
- The camera provides useful views from all portions of the flight path.
- The waypoint spacing provides sufficient flight time for the desired video segments.
- There are no obstacles or other conditions that could interfere with subsequent flights.
This test flight establishes the baseline for all subsequent flights.
Flight Execution
Rather than attempting to record an entire construction phase during a single flight, divide the waypoint mission into short video segments that overlap. For example, waypoints 1 through 3, 2 through 4, 3 through 5, etc.
- Capture Short Segments
Each segment should generally contain 5 to 20 seconds of usable footage, depending on how much of the construction site needs to be shown during that particular phase.
Shorter segments provide the ability to show a greater number of progressions or construction phases.
- Record Each Segment Multiple Times
Fly each segment three times.
Although the same waypoint mission is used for each flight, the resulting footage will typically contain small differences in camera position and framing. These differences may result from:
- Minor waypoint-positioning variations
- Differences in aircraft altitude
- Variations in aircraft heading
- Slight differences in gimbal pitch or yaw
Recording three takes provides multiple versions of each segment from which the best-matching footage can be selected during editing.
- Maintain Overlap Between Segments
Subsequent mission segments may begin one or two waypoints before the ending of the preceding segment.
This overlap provides additional footage that can be used to match the end of one construction phase with the beginning of the next. It also gives the editor more flexibility when compensating for small differences between flights.
- Repeat Throughout Construction
Continue capturing footage using the same mission at appropriate stages of construction. Depending on the project, the documentation process may span a year or more before sufficient footage has been collected to show the complete progression from beginning to end.
Whenever possible, maintain the same mission, aircraft altitude, camera configuration, and camera orientation for every flight. Avoid modifying the original waypoint mission once the progress-video sequence has begun.
The objective is to make the flight path as repeatable as possible so that differences between construction phases are primarily the result of the construction itself rather than changes in the camera perspective.
Video Editing
Even with a carefully controlled flight procedure, footage from separate flights will generally require some alignment adjustments during editing.
- Increase the Scale of Each Segment
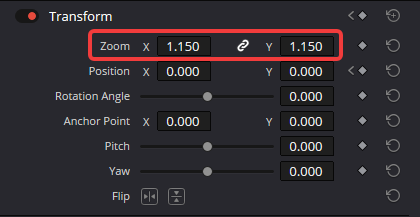
Scale each video segment to approximately 115%.
The additional scale provides a margin that allows the footage to be repositioned horizontally and vertically without exposing the edges of the original video frame.
The exact scale can be adjusted depending on the amount of alignment correction required and the resolution of the source footage. I find 115% works well.
Setting the clip position in Davinci Resolve - Align the New Segment with the Previous Segment
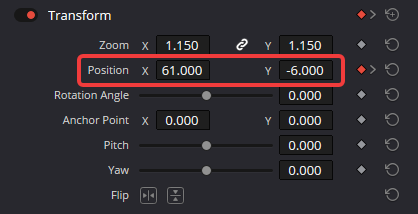
Adjust the X and Y position of the new video segment until its beginning closely matches the preceding segment.
The goal is to align stationary features that appear in both clips. Buildings, structural elements, roads, trees, or other relatively permanent features are useful reference points.
This process effectively compensates for small differences in the aircraft's position and camera framing between flights.
Use keyframes in Davinci Resolve - Use Keyframes to Smooth the Alignment
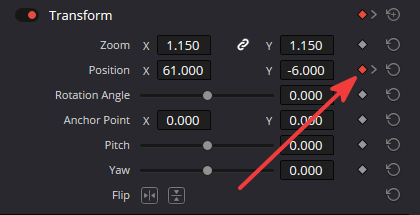
Use position keyframes to gradually transition the corrected footage back to its normal position.
At the beginning of the segment:- Adjust the X and Y position to align the footage with the preceding segment.
- Set a position keyframe at this corrected location.
As the segment progresses:
- Gradually reduce the X and Y offsets.
- End the segment at the normal 0, 0 position.
This allows the transition between flights to begin with closely matched imagery while gradually returning the new footage to its original framing.
The transition is generally less noticeable than an abrupt change in camera position at the cut between clips.
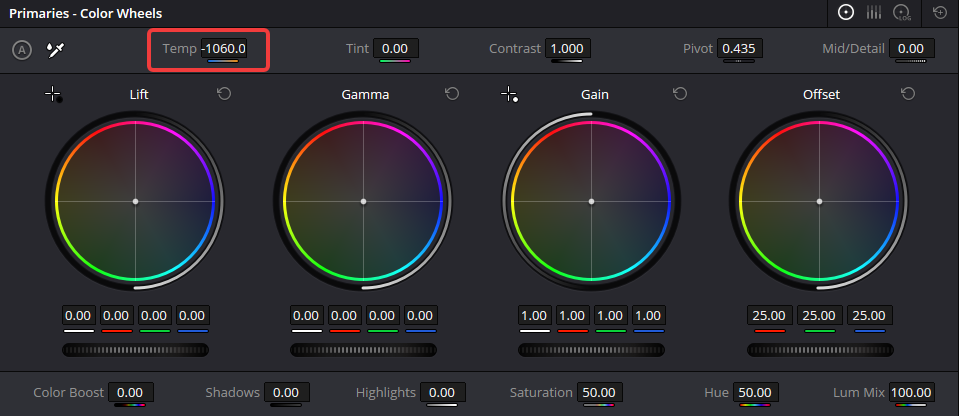
Set color temperature in Davinci Resolve - Correct Color Temperature
Footage captured on different days may have noticeably different color characteristics because of changes in sunlight, cloud cover, time of day, or camera settings.
Adjust the color temperature of individual segments as necessary so that adjacent clips have a consistent appearance.
Other color parameters, such as exposure, contrast, highlights, and saturation, may also require adjustment if lighting conditions changed significantly between flights.
Recommended Workflow
The complete process can be summarized as follows:
- Create a circular or elliptical waypoint mission around the construction site.
- Perform a complete test flight and verify the camera framing.
- Divide the mission into short 5–20 second video segments.
- Fly each segment three times.
- Maintain a one or two-waypoint overlap between adjacent segments where practical.
- Repeat the same mission throughout the construction project.
- Select the take that provides the best visual match for each construction phase.
- Scale each segment to approximately 115%.
- Align each new segment with the preceding segment using X and Y position adjustments.
- Use keyframes to gradually return the X and Y offsets to zero.
- Adjust color temperature and other image characteristics as necessary.
- Assemble the segments into the final construction-progress sequence.
Result
This workflow takes advantage of the repeatability of waypoint missions while recognizing that consumer and professional drone positioning systems cannot reproduce a flight path with pixel-level camera alignment on every flight.
By capturing multiple takes, maintaining overlap between segments, and correcting small positional differences during editing, footage from flights conducted days, weeks, or months apart can be combined into a much more consistent visual sequence.
The resulting video can clearly show the progression of construction while maintaining a relatively stable camera perspective, making changes to the site easier to see and compare over time.