Light Painting With Waypoints


Light painting is a photographic technique where a photographer uses a long exposure to capture the movement of a light source. The photographer can use a flashlight, LED lights, or even a drone to create patterns, write words, or draw images in the sky. By moving the light source during the exposure, the photographer can create unique and creative images that capture the essence of light and movement. Light painting can be done in a dark room or at night and can create stunning and surreal images that are not possible with other photographic techniques.
Light painting with a drone is a type of light painting where a drone equipped with LED lights is flown in the air to create patterns and designs. The drone's movements and lights are captured using a long exposure, resulting in stunning and unique images.
This is a step-by-step guide to light painting with a drone. There are a number of steps to complete and some of them are manual. The steps include the use of several software components:
- Google Search (to find a suitable drawing)
- Software to convert an image to a waypoint mission
- SVG to Litchi Mission converter
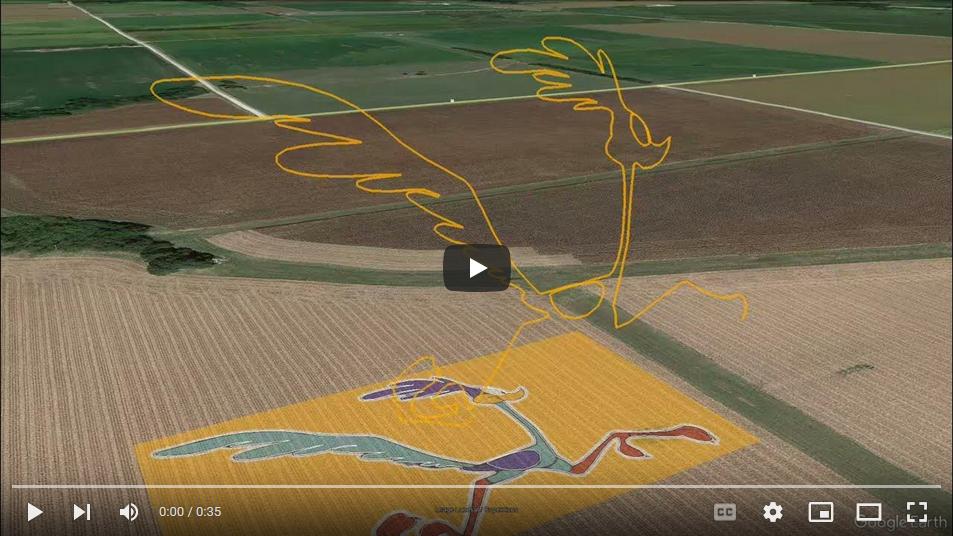
- Google Earth Pro (to optionally create the initial path manually)
- Litchi's Mission Hub (to import and make height adjustments)
- Litchi Mission Rotator (to rotate the path around the X-axis (Longitude-axis)
- Virtual Litchi Mission (to confirm and validate the flight)
- Fly the mission using either Litchi or DJI Fly using a DJI drone that supports waypoints
Light painting with a drone requires some skill and experience in flying drones and using long exposure photography techniques. However, the results can be incredibly rewarding, and the possibilities for creativity are endless.

Step 1: Obtain an image representing the shape to be painted.
Although any image will work, an SVG line drawing would be most suitable for this step. When searching, using the term "svg drawing" helps to narrow down the search results to only include appropriate images. For example, this sample image was found using the search string "roadrunner drawing". Save the image to your computer.
TIP: If you cannot find an SVG file of the shape you want to paint, you can use a converter to convert to an SVG file. For example, these converters will convert a PNG image to an SVG file:
Use the SVG to Waypoint Mission converter to convert this image into a waypoint mission.
If you are unable to find or create a suitable SVG file, it is also possible to manually trace a path around any image. This is a manual step but can lead to excellent results.
Step 2: Remove waypoints that are too close together
Paths created from a drawing will often result in a few waypoints that are closer together than what Litchi or DJI allows. Those extra waypoints need to be removed using the Remove Close Waypoints utility.
- Specify the csv/kml/kmz file containing the mission or path created in step 1.
- Remove the close waypoints.
- Save the output as a new CSV file.

Step 3: Rotate this mission using the Litchi Mission Rotator
Use the Litchi Mission Rotator to rotate the mission around the X-axis (Longitude-axis) into the vertical plane. Save the result as a new Litchi CSV file.
IMPORTANT: Light painting missions may be comprised of separate, disconnected paths. By default, a straight line will connect these disconnected paths showing the path of the drone. Since it is generally undesireable to see these connections in the final painting, the drone should be configured to turn away from the camera during these transitions. Page two of the Litchi Mission Rotator utility may show "Possible Turns" in its output. Copy these values, back up to the main "Litchi Mission Rotator" page, and paste these into the "Optional Waypoint Turns" field, then rotate the mission a second time, Doing so, should remove those lines that connect one portion of the mission to the other.
Import the rotated mission into Litchi. This new mission will initially look like all waypoints are in a straight horizontal line. That is to be expected because the entire flight has been rotated into the X-Z plane. Use Litchi's "Rotate", "Translate", and "Scale" functions to orient the mission into its final, desired location.
- Rotate: Select "Rotate" tool. Click anywhere off the mission to define the center of rotation. Click on and drag any waypoint to rotate the entire mission. Unselect the "Rotate" tool.
- Translate: Select the "Move" tool. Click and drag any waypoint to move the entire mission. Unselect the "Move" tool.
- Scale: Click on any waypoint and drag left or right to scale the mission around the selected waypoint. Unselect the "Scale" tool. Note that the scale tool only scales in the longitude/latitude directions without affecting the height. Use of this tool will distort your light painting.
IMPORTANT: The Litchi Mission Rotator will add one or two POIs to your mission.
- POI #1 will be added below (to the south) of the rotated mission. After using Litchi to move the rotated mission to its final location, POI #1 should be positioned to the location of the land camera. This will cause the drone's heading (and light) to always point at your land camera.
- A second POI (POI #2) may be added above (to the north) of your mission. This POI is only added if you have specified any waypoints where the drone is to be turned away from your camera. After moving the rotated mission to its final location, POI #2 should be positioned behind the mission and away from the land camera causing the drone to point away from the land camera for any turned waypoints.

Step 4: Confirm rotated mission in Google Earth Pro
If the mission is exported from Litchi using Virtual Litchi Mission, you will see the mission vertically oriented. By default, Google Earth Pro will extend the path to the ground. If you wish to see only the rotated outline as shown to the right, right-click on "Smooth Flight Path" in the left menu of Google Earth Pro. Select "Properties". Select the "Altitude" tab. Uncheck the "Extend path to ground" checkbox. Once done, only the outline is displayed.
Step 5: Fly and record the mission
At this point your vertical mission is ready to be flown and recorded. For light painting you will probably want to attach a strobe or light to your drone. You will also want to have a camera on a tripod to capture the flight. The distance from the camera to the drone should be over 100m to reduce foreshortening. Details on how to do these steps are up to you.
Tip: It is also possible to fly these light painting missions using a DJI Fly drone (Mavic 3, Mini 4, Air 3) by converting the light painting mission CSV file into a KMZ file using the "Litchi to DJI Fly" converter utility.
Drone Light Attachments
You will need to attach a light to your drone. The type of drone and light you use will determine what type of attachment you need. For example, here are a couple attachments that will work with a Mavic 2 or Mavic 3:
- Nightflight LED Position Light for Mavic 2 (Amazon)
- GoPro Mount for Mavic 3 (Amazon)
Some cube lights come with color filters (Ulanzi cube lights, LumeCubes, etc.) that allow you to change the color of the light from the drone. This allows for some creative potential. You can paint an entire image in one color or separate the scene into multiple components and paint each component using a separate mission. This will allow each component to be painted in a different color. Then, in post, the separate light paintings can be combined into a final, composite image. This is a more complex process and requires a good grasp of the basic light painting process to be successful. See the images at the top of this page for examples.
Camera Settings
The distance between the light painting mission and the land camera will depend on the focal length of the lens. For example, a distance of 250m works well with a 30mm lens.
Generally, an ISO of 100 should be used with the camera in "bulb" mode so that the shutter can be kept open as long as the mission takes to fly. If possible, a wired or wireless remote trigger should be used to avoid camera movements.
An F-stop of f/8-f/14 can be used depending on the ambient light.
Other Factors To Consider
It is important to note the difference between Virtual Stick waypoints and On-Board waypoints for light painting. On-Board waypoints will result in much smoother and generally more accurate drawings.
More Information on Light Painting
- Light Painting Examples
- Light Painting Examples
- Light Painting Examples
- How To Light Paint Landscapes At Night Using A Drone
- How To Light Paint With Your Drone
- DroneDJ